1-S: The Witless
LOOKS LIKE YOU'RE AT WIT'S END T. HAKITA |
| – Developer Message |
| 1-S: THE WITLESS | |||
|---|---|---|---|

| |||
| General | |||
| Layer & Part | LIMBO /// SECRET | ||
| Music | Sanctuary in the Garden of the Mind | ||
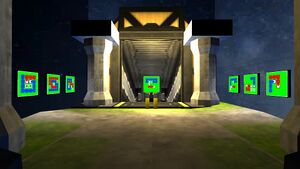
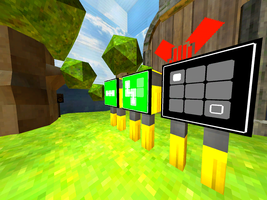
1-S: THE WITLESS is Limbo's secret level, accessed through a secret exit on 1-1: HEART OF THE SUNRISE. The name and content of the level are based on the 2016 puzzle video game The Witness. Progression of the level is linear, with five rooms containing puzzle screens within each room that must be completed in order to enter the following room. Completing the level requires completing a total of 26 puzzles before the level's exit door opens.
The level follows the theme of Limbo — a false paradise. Throughout the level, the time of day switches from day to night. Multiple speakers are hidden throughout the level. The speakers play the sounds of birds chirping — breaking the speakers stops the sound.
Puzzle Elements
Throughout the level, several puzzle elements are introduced. These are;
 Boxes — clicking and holding on them, then dragging over an empty grid space will make a line. Connecting the line with an
  Exit Box completes the puzzle.
 Rings must be collected before connecting the line to the Exit Box.
 Pits must be avoided for the completion of a puzzle containing them.
- Colored Boxes and Colored Exit Boxes can be one of three colors; Red, Blue, or Green. Colored Boxes must be connected to a Colored Exit Box of its color, or a White Exit Box.
- Colored Rings must be collected with a line of the same color.
- Colored Pits must be avoided by the line of its color, however, other lines can pass through it without resulting in failure.
- Collecting Rings is done by clicking on a Box and dragging its line over a Ring.
- Completion of a puzzle is indicated by the green background.
- Failure is indicated by a red flash on the puzzle screen and a subsequent buzzer.


Puzzles
Like most other Secret Missions (excluding 0-S: SOMETHING WICKED, as it allows the ![]() Piercer Revolver, and 7-S: Hell Bath No Fury, as it allows all weapons), the Elevator Room does not have a Terminal, and weapons are unusable.
Piercer Revolver, and 7-S: Hell Bath No Fury, as it allows all weapons), the Elevator Room does not have a Terminal, and weapons are unusable.

Each puzzle screen functions like a Terminal; activation and deactivation based on distance. Puzzles vary sizes in grids; 1x3, 2x3, 3x3, 4x4, and 5x5.
In the second room, ![]() Rings are introduced.
Rings are introduced.

After completing the puzzles in the second room, the door to the third room unlocks, and the time of day changes to evening.
The third room of the level introduces ![]() Pits. They are the opposite of
Pits. They are the opposite of ![]() Rings; you must avoid them. This room also introduces bigger grids for each screen.
Rings; you must avoid them. This room also introduces bigger grids for each screen.

The fourth room has four puzzles on the left and right sides of the room. The puzzle screens on the left have a 4x4 grid. These puzzles feature every element from before;
![]() Boxes,
Boxes, ![]() Rings,
Rings, ![]() Pits. The puzzle screens on the right start with a 2x3 grid. New elements are introduced; blue boxes and red boxes -- matching them with an exit of their color is necessary for completion.
Pits. The puzzle screens on the right start with a 2x3 grid. New elements are introduced; blue boxes and red boxes -- matching them with an exit of their color is necessary for completion.

Left wall of "Advanced & Colors." Two columns are seen.
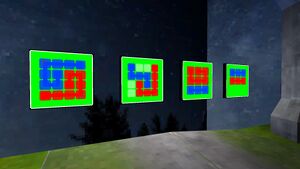
Right wall of "Advanced & Colors." Two more columns are seen.


After the door to the fifth room unlocks, the time of day changes to night.
The fifth room presents ![]() Green Colored Boxes and re-introduces
Green Colored Boxes and re-introduces ![]() White Exit Boxes. The ninth puzzle is in front of the level exit. Accessing it requires completion of the 8 puzzles.
White Exit Boxes. The ninth puzzle is in front of the level exit. Accessing it requires completion of the 8 puzzles.

Left wall of the Finale.
"Finale." Four columns are seen.
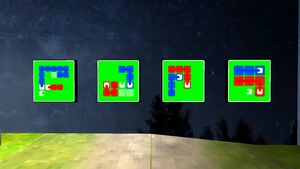
Right wall of the Finale.


When the ninth puzzle is completed, the level exit door opens and a Testament Terminal stands before the pit. Completing the level sends the player back to 1-1: Heart of the Sunrise.
Testament Log
FAILURE AFTER FAILURE AFTER FAILURE
AFTER FAILURE AFTER FAILURE AFTER
FAILURE AFTER FAILURE AFTER FAILURE
AFTER FAILURE AFTER FAILURE
THE RESULTS REFUSE TO ALTER
AGAIN AND AGAIN AND AGAIN AND AGAIN AND
AGAIN AND AGAIN AND AGAIN AND AGAIN AND
AGAIN AND AGAIN AND AGAIN AND AGAIN AND
AGAIN AND AGAIN AND AGAIN AND AGAIN
Finale Skip
The skip for the final room is achieved by going through the top of the elevator's door.
This is possible because the elevator does not have collision on the door decoration, and because of an oversight in map geometry.
Performing the skip shows a developer message;
LOOKS LIKE YOU'RE AT WIT'S END T. HAKITA |
| – Developer Message |
- T. stands for "terveisin", Finnish for "sincerely" or "with regards".[1]

Cheats
- Because the level does not allow any weapons to be used, the
 Spawner Arm will appear after it's equipped, or after a puzzle screen is activated.
- Noclipping to the fifth room skips the trigger that changes the fake sky texture. Because of a mapping shortcut/oversight, the fake sky above the door has the night sky texture.

- Spawning any of these enemies outside the start elevator will cause them to be unable to move or be in a falling state indefinitely. This occurs because the level is missing a navigation mesh.
Enemies that aren't listed are flying or stationary and therefore do not require a navigation mesh to move.
 Filth
Filth Stray
Stray Schism
 Soldiers
 Stalkers
 Streetcleaners
 Sentry
 Swordsmachine
 Cerberus
 Minos Prime
 Sisyphus Prime
Trivia
- Unlike other screens in Limbo, the fake sky does not emit a buzzing sound if the player is stood right next to it.
- There is a total of 5 speakers. The particles the speakers emit after being destroyed do not despawn.
- This level uses a unique "Locked Door" icon, as its only other appearance is in 0-2: The Meatgrinder.[citation needed]
Media
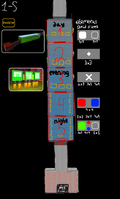
Reference Sheet for the entire level
Level thumbnail
