7-4: ...Like Antennas to Heaven
| 7-4: ...LIKE ANTENNAS TO HEAVEN | |||
|---|---|---|---|

| |||
| General | |||
| Layer & Part | VIOLENCE /// CLIMAX | ||
| Challenge | Don't fight the security system. | ||
| Music | War Without Reason | ||
| Tip of the Day | |||
A direct hit from the Knuckleblaster has extremely powerful knockback, making it extremely powerful for launching enemies into pits and other environmental hazards.
| |||
| Enemies | |||
| Rank Requirements | |||
| Rank | Time | Kills | Style |
| S | 05:30 | 32 | 16,500 |
| A | 06:00 | 28 | 15,000 |
| B | 08:00 | 18 | 9,000 |
| C | 12:40 | 6 | 3,500 |
- This article covers a simplified account of the boss fight for 1000-THR "Earthmover". For more detail on the boss, see 1000-THR "Earthmover".
7-4: ...Like Antennas to Heaven is the final level of Violence, featuring the ![]() Earthmover. The player emerges from a bunker, faced with a towering machine that must be scaled.
The song in this level is War Without Reason.
Earthmover. The player emerges from a bunker, faced with a towering machine that must be scaled.
The song in this level is War Without Reason.
Level

Start
The player starts off in what appears to be an underground bunker, which they must slide underneath a gap and scale a small flight of stairs to exit. Upon exiting they will be greeted by a looming Earthmover, who prepares to fire upon them before being struck by another of its kind that it was battling across the pale sands and raining fire of the third ring of Violence.
Across a gap, there are three Hookpoints to ascend the ![]() Earthmover's leg. On a thin walkway, two
Earthmover's leg. On a thin walkway, two ![]() Streetcleaners will spawn. Past them, two jump pads will take the player to the base of the torso.
Streetcleaners will spawn. Past them, two jump pads will take the player to the base of the torso.
A yellow Hookpoint will activate platforms for the player to jump across, and at the end of them a ![]() Sentry will spawn, followed by a
Sentry will spawn, followed by a ![]() Guttertank. Past it are red hot pipes that can damage the player, and a gap. Across another gap are two
Guttertank. Past it are red hot pipes that can damage the player, and a gap. Across another gap are two ![]() Soldiers and then another
Soldiers and then another ![]() Sentry. When the player approaches it, a
Sentry. When the player approaches it, a ![]() Gutterman will spawn behind them.
Gutterman will spawn behind them.
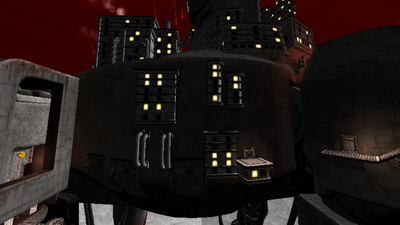
Jumping on to the circular platform causes two ![]() Guttertanks to spawn. On the next ledge, there is a window displaying the fleshy interior of the
Guttertanks to spawn. On the next ledge, there is a window displaying the fleshy interior of the ![]() Earthmover, and a building with a
Earthmover, and a building with a ![]() Malicious Face and two
Malicious Face and two ![]() Mannequins.
Mannequins.
Defence System

Passing the checkpoint will activate a miniboss encounter. The player is locked into the arena by a barrier, and is first faced with two rocket launchers and an invulnerable machine that fires a tracking laser. As the player destroys the rocket launchers, two mortar launchers will take their place, which will be joined by two rods that fire ![]() Hell Seekers. The weapons can damage each other.
Hell Seekers. The weapons can damage each other.
Once all other weapons have been destroyed, the laser will become vulnerable and speed up substantially. When defeated, the barrier will shut down and an elevator will be available to ride upwards.
In an alley blocked off and beside the arena, there is a book.
WAR NO LONGER NEEDED ITS ULTIMATE PRACTITIONER. IT HAD BECOME A SELF-SUSTAINING SYSTEM. MAN WAS CRUSHED UNDER THE WHEELS OF A MACHINE CREATED TO CREATE THE MACHINE CREATED TO CRUSH THE MACHINE. SAMSARA OF CUT SINEW AND CRUSHED BONE. DEATH WITHOUT LIFE. NULL OUROBOROS. ALL THAT REMAINED IS WAR WITHOUT REASON.
A MAGNUM OPUS. A COLD TOWER OF STEEL. A MACHINE BUILT TO END WAR IS ALWAYS A MACHINE BUILT TO CONTINUE WAR. YOU WERE BEAUTIFUL, OUTSTRETCHED LIKE ANTENNAS TO HEAVEN. YOU WERE BEYOND YOUR CREATORS. YOU REACHED FOR GOD, AND YOU FELL. NONE WERE LEFT TO SPEAK YOUR EULOGY. NO FINAL WORDS, NO CONCLUDING STATEMENT. NO POINT. PERFECT CLOSURE.
T H I S I S T H E O N L Y W A Y I T S H O U L D H A V E E N D E D .


Interior
Once inside the player will be greeted with a message from the ![]() Earthmover's security system:
Earthmover's security system:
There are 6 ![]() Idols on a set of platforms that are powering a barrier in the ceiling, and must be destroyed as boiling blood rises from the floor. If the player falls into the blood, they will be damaged and knocked back upwards.
Idols on a set of platforms that are powering a barrier in the ceiling, and must be destroyed as boiling blood rises from the floor. If the player falls into the blood, they will be damaged and knocked back upwards.
Once cleared, a path opens to a series of jump pads, Hookpoints, and damaging floors in a short platforming section inside of the neck.
Boss Encounter
The boss is the ![]() Earthmover's brain, at the center of a circular room with a raised edge by the walls. It defends itself against the player with horizontal, rotating lasers, and fires large
Earthmover's brain, at the center of a circular room with a raised edge by the walls. It defends itself against the player with horizontal, rotating lasers, and fires large ![]() Hell Seekers that can be parried back at it. The brain is contained within a barrier that is not bulletproof, but will damage the player if they touch it.
Hell Seekers that can be parried back at it. The brain is contained within a barrier that is not bulletproof, but will damage the player if they touch it.
After enough time passed it will spawn 2 ![]() Idols in cases that are open from the back, while the lasers start spinning faster. It can spawn these indefinitely, and it can also be killed before it spawns any.
Idols in cases that are open from the back, while the lasers start spinning faster. It can spawn these indefinitely, and it can also be killed before it spawns any.
Escape

Once defeated, the brain will start exploding, and the player will be warned with a countdown:
If the timer reaches 0, the player will instantly die. They must go back down the neck the same way they came in, and will be faced with a wave of enemies in the large room, including 1 ![]() Sentry, 6
Sentry, 6 ![]() Filth, 4
Filth, 4 ![]() Strays, 2
Strays, 2 ![]() Schisms, and 2
Schisms, and 2 ![]() Soldiers. 2
Soldiers. 2 ![]() Guttertanks will spawn after enough of the other enemies have died, but while some are still left alive.
Guttertanks will spawn after enough of the other enemies have died, but while some are still left alive.
After all enemies are killed the door will open, leading to a jump pad that will launch the player away from the ![]() Earthmover as it explodes, leaving its debris in the ashen wastes.
Earthmover as it explodes, leaving its debris in the ashen wastes.
Challenge
In order to complete the level challenge, the player must find a way around the Defense System and enter the interior using an hidden path. Nearby the Defense System arena stands a crane carrying a bomb, climbing on top and using the ![]() Electric Railcannon on the electrical coils to power the crane, part of the Earthmover will be blown open by the bomb's detonation and reveal a new entrance.
Electric Railcannon on the electrical coils to power the crane, part of the Earthmover will be blown open by the bomb's detonation and reveal a new entrance.
Easter eggs
- A plush of lead 3D-artist Victoria Holland can be found at a control panel when no-clipping inside the Earthmover's brain.
- The control panel reads "GORP LIGHT: ON", switching to "GORP LIGHT: OFF" once the Earthmover starts dying.
- A large plush of concept artist BigRockBMP can be found seated on the second Earthmover.
- A few buildings on the Earthmover's side make up the loss meme.
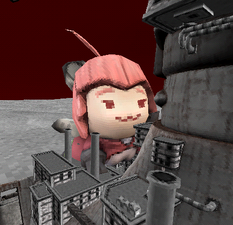
- A tiny top hat can be found on the Earthmover's head
- A potted sunflower can be found when no-clipping through a door located within a building nearby the Security System boss fight, alongside a warning sign written in Japanese, the text translates to "Generator Siphon Plant Plant", being a play on words.

Plush of Victoria found within the Earthmover's brain.
Plush of BigRock found on the second Earthmover.
"Loss" made up of buildings on the Earthmover's side.
How fashionable! A top hat found on the Earthmover's 'Head'
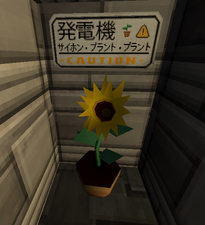
Plant within the Earthmover.


Trivia
- The level title is named after the album Lift Your Skinny Fists Like Antennas to Heaven, by Godspeed You! Black Emperor.
- As the Earthmover itself is counted as an enemy, disabling enemies using cheats will spawn in a jump pad to ensure the exit door is reachable, currently making 7-4 the only level where additional objects appear when enemies are disabled.