| V2
|
|
| General
|
| Class
|
Supreme Machine
|
| Health
|
40
|
| Weight
|
Heavy (Grounded)
|
| Rank
|
6
|
  Locational Damage Locational Damage
|
Head (2x)
|
✗
|
Limb (1.5x)
|
✗
|
| Conditional Modifiers
|
Flammable?
|
|
Airshot?
|
|
| Damage Type Modifiers
|
| - Standard Revolvers (Head): 200%
- Standard Revolvers (Limbs): 150%
- Revolvers: 60%
|
| Radiance Multipliers
|
| Health
|
1.5x
|
| Damage
|
1.5x
|
| Speed
|
1.25x
|
| Appearances
|
| 1-4
|
V2 is the second machine in the "V" series, the first being V1. V1 first encounters V2 as the boss of 1-4: CLAIR DE LUNE and the final boss of the Limbo Layer, where it is first seen when V1 places the first skull in the level and walks back to the door where it will be seen sliding across the lower hallway for a moment. It is then finally revealed to V1 after it places the 3 skulls and enters the arena, where it will jump out of a window to land on the floor near the water, then stand up and politely bow before the fight starts.
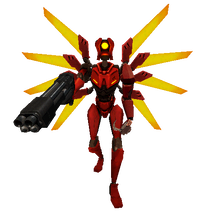
Appearance
V2 is almost identical to V1 in terms of appearance, having a humanoid form with an elongated, cylindrical head resembling a CCTV camera. It also has eight winglike protrusions, and the label "V2" is embossed on its chestpiece to its left. In contrast to V1, its entire body is red and it is armed with the  Knuckleblaster instead of the
  Feedbacker.
Behavior
V2 shares many of V1's abilities, being able to slide, jump, dash, and use the  Piercer Revolver and
  Core Eject Shotgun.
Movement Patterns
V2 has four movement patterns which it will switch between depending on its distance from V1. Each pattern is telegraphed by a unique vocalization and indicated by the color of its wings:
- Gold wings mean that V2 will pick a direction to run in until it collides with something, upon which it will pick a new direction.
- Blue wings mean that V2 wants to circle-strafe around V1 while slowly getting closer.
- Red wings mean that V2 wants to rush V1 down, advancing aggressively and using slides to close distance. Once a certain minimum distance is reached, it will circle-strafe at close range until V1 retreats or until it shifts movement patterns again. This is the only movement pattern V2 will use when enraged.
- Green wings mean that V2 wants to rapidly gain distance away from V1 until the outer limit of its preferred range is reached, at the expense of greatly reducing its attack speed. Activates when V1 stays close to V2 for too long, but will not trigger if V1 is below 33 health.
Keeping a certain minimum distance from V2 for a prolonged period will deplete its patience, indicated by the rising indicator gauge under its health bar. Once the gauge fills up, V2 will become enraged, yielding the + ENRAGED style bonus. While enraged, V2 will have a faster base movement speed than V1 and will aggressively advance, it will cancel its slides earlier to chase more accurately, and its Piercer charge shots will have no cooldown. Its rage will wear off after remaining within its preferred range for long enough.
Speed Debuffs
V2's movement speed has several possible debuffs to make healing off its blood slightly easier:
- Ground movement is 10% slower if V1 has 33 health or less on Violent difficulty or lower.
- Ground movement is 10% slower if V1 is within 10 units of V2 on Standard difficulty or lower (stacks with above debuff).
- Jumps are shorter if V1 is within 10 units on Standard difficulty or lower with an additional jump height debuff if V1 has 33 health or less.
- Cannot slide at close range and will cancel slide sooner if player has 50 health or less on Standard difficulty or lower.
- V2's ground and air movement speed is reduced while it is stuck with a
 Screwdriver drill.
Attacks
Revolver Burst
V2 prefers to use this attack at a distance from V1. It will rapidly fire 3 consecutive revolver shots. Each shot deals 10 damage points. The shots can be parried although it is extremely difficult to do so. If the shots hit a coin they will flash red for a second before attempting to hit V1. Shooting the coins while they're flashing red will make them target V2 again and give the + COUNTERRICOSHOT x [amount of coins] style bonus. V2 does not perform this attack while it is enraged.
Piercer Charged Shot
V2 prefers to use this attack at a distance from V1. It will charge up the alternate fire of the Piercer Revolver and shoot it at V1. This attack deals 30 damage points, can be parried, and can also interact with coins as the Revolver Burst does.
Shotgun Blast
V2 prefers to use this attack at close range of V1. It will fire twelve pellets from its shotgun that deal 25 damage. The pellets can be parried back to V2, however they won't give the + PROJECTILE BOOST style bonus.
Core Eject Grenade
During this attack, V2 fires its shotgun's core similarly to V1's Core Eject Shotgun. This attack deals 35 damage. The core cannot be parried but it can be sniped, creating a red explosion.
Strategy
V2 serves as the first major test of all V1's abilities; it tests their movement and stamina management, their aim, and their weapon usage.
The  Marksman Revolver's Coins and Projectile Boosts are the most reliable ways to deal damage to V2, due to its agile nature. Combining the coins with the
  Electric Railcannon is an extremely effective strategy.
The  Alternate Piercer can also do a lot of damage to V2, however it can be difficult to aim with it.
Airshots with the  Rocket Launcher, although requiring the wielder to be skilled at aiming, are extremely strong and can eat through huge chunks of V2's health.
Placing a Magnet on V2 will make the silver nails from the  Attractor Nailgun and the burst from the
  Overheat Nailgun home in on V2. Experienced players can also attempt to use Overheat Storage for practically infinite heatsinks for as long as they can keep the combo up.
Healing off V2 is not an easy task. Waiting for V2's wings to turn red, have it approach you and then blasting it with the Shotgun provides plenty of healing and also does good damage to V2. Parrying its Shotgun Blast with the Feedbacker will refill health up to the hard damage limit, recharge all stamina and deal a good amount of damage back to V2 itself.
Stamina is greatly important in the V2 fight, as dodging V2 requires a lot of dashing in order to not be hit. All of its attacks can be dashed through, however its Shotgun Blast can be parried back instead which is extremely useful for stamina conservation. Sliding around can be dangerous as too much time spent away from V2 will lead to it enraging, making it very important to stay relatively close to V2 at all times.
Defeated
When defeated, V2 will fall down, get up and run towards the center of the arena to jump up into the fake Limbo sky, dropping the Knuckleblaster in the process. The player can then pick it up, also opening up the end of the level.
Terminal Entry
TYPE: SUPREME MACHINE
DATA:
The V model was built for war, with V1 boasting a new kind of exterior plating that allowed refueling through contact with blood rather than through a separate blood refueling process.
Due to its necessary thinness, it is far less durable, but the ability to fix itself and rebuild broken parts on the fly would outweigh the negatives on an active battlefield.
However, during the prototyping phase, the New Peace was established and war became irrelevant.
V1’s planned production was cancelled and an updated model, V2, was developed instead, using the standardized plating, since durability was far more important during times of peace when no bloodshed was necessary.
Neither model ever reached mass production due to the end of wars completely draining any demand, so it’s likely only a single prototype build of each model remains in existence.
STRATEGY:
- V2 is adept at controlling space and will take advantage of this to change the flow of battle to throw off its opponent. Stay too close and it will run away. Stay far away and it will come close.
- V2's high mobility makes it a tricky target to hit, and especially difficult to heal off of. When in need of blood and unable to catch up, it's instead recommended to stay away from it and let it come to you instead.
- V2 will switch weapons depending on the distance from its target, so if one of its weapons is difficult to avoid, a change in proximity will close it off.
- Knowledge of the synergies of one's own arsenal can allow one to turn V2's weapons against it.
Media
| V2 (2ND)
|
|
| General
|
| Class
|
Supreme Machine
|
| Health
|
50 (Phase 1)
30 (Phase 2)
|
| Weight
|
Heavy (Grounded)
|
| Rank
|
6
|
| Locational Damage
|
Head (2x)
|
✗
|
Limb (1.5x)
|
✗
|
| Conditional Modifiers
|
Flammable?
|
|
Airshot?
|
|
| Damage Type Modifiers
|
| - Standard Revolvers (Head): 200%
- Standard Revolvers (Limbs): 150%
- Revolvers: 60%
|
| Radiance Multipliers
|
| Health
|
1.5x
|
| Damage
|
1.5x
|
| Speed
|
1.25x
|
| Appearances
|
| 4-4
|
V2 (2nd) is the second and final encounter V1 has with V2 as the boss of 4-4: CLAIR DE SOLEIL, and the final boss of the Greed Layer, in a rematch to end the rivalry between it and V1 and to reclaim its arm. V2's second fight is introduced by it slouching on a stone throne in the middle of the arena, watching V1. As soon as V1 gets close, V2 gets up and cracks its knuckles. Four pillars around the room rise and the throne breaks as the fight begins.
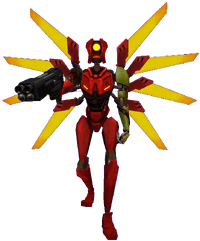
Behavior
In place of the Knuckleblaster, V2 now possesses the  Whiplash. Although V2 does not use it in the fight, it now has access to the Marksman Revolver and the Overheat Nailgun, making it a much more threatening enemy.
Movement Patterns
V2 has four movement patterns which it will switch between depending on its distance from V1. Each pattern is telegraphed by a unique vocalization and indicated by the color of its wings:
- Gold wings mean that V2 will pick a direction to run in until it collides with something, upon which it will pick a new direction.
- Blue wings mean that V2 wants to circle-strafe around V1 while slowly getting closer.
- Red wings mean that V2 wants to aggressively rush down and keep close to V1. This is the only movement pattern V2 will use when enraged.
- Green wings mean that V2 wants to rapidly gain distance away from V1 until the outer limit of its preferred range is reached, at the expense of greatly reducing its attack speed. Activates when V1 stays close to V2 for too long, but will not trigger if V1 is below 33 health.
Keeping a certain minimum distance from V2 for a prolonged period will depletes its patience, indicated by the rising indicator gauge under its health bar. Once the gauge fills up, V2 will become enraged, yielding the + ENRAGED style bonus. Punching this version of V2 with the Knuckleblaster will also instantly enrage it. While enraged, V2 will have a faster base movement speed than V1 and will aggressively advance, it will cancel its slides earlier to chase more accurately, it will not attempt to shoot at any coins, and its Piercer charge shots will have no cooldown. Its rage will wear off after remaining within its preferred range for long enough.
Speed Debuffs
V2's movement speed has several possible debuffs to make healing off its blood slightly easier:
- Ground movement is 10% slower if V1 has 33 health or less on Violent difficulty or lower.
- Ground movement is 10% slower if V1 is within 10 units of V2 on Standard difficulty or lower (stacks with above debuff).
- Jumps are shorter if V1 is within 10 units on Standard difficulty or lower with an additional jump height debuff if V1 has 33 health or less.
- Cannot slide at close range and will cancel slide sooner if player has 50 health or less on Standard difficulty or lower.
- V2's ground and air movement speed is reduced while it is stuck with a Screwdriver drill.
Attacks
Revolver Burst
V2 prefers to use this attack at a distance from V1. It will rapidly fires 3 consecutive revolver shots. Each shot deals 10 damage points. The shots can be parried although it is extremely difficult to do so. When the shots hit a coin, the coin will flash red for a second before attempting to hit V1. Shooting the coins while they're flashing red will make them target V2 again and give the + COUNTERRICOSHOT x [amount of coins] style bonus. V2 does not perform this attack while it is enraged.
V2 will target all active coins with a variation of this attack that only shoots one revolver shot, unless it is enraged.
Piercer Charged Shot
V2 prefers to use this attack at a distance from V1. It will charge up the alternate fire of the Piercer Revolver and shoot it at V1. This attack deals 30 damage points and can't be parried, however, it can also interact with coins as the Revolver Burst does.
V2 does not target coins with this attack.
Coin Throw
V2 can throw 4  Coins from the Marksman Revolver and proceed to use a variation of the Revolver Burst attack on them. The coins can be punched and shot by V1. When coins are shot they will flash red for a second before attempting to hit V1. Shooting the coins while they're flashing red will make them target V2 again and give the + COUNTERRICOSHOT x [amount of coins] style bonus. If V1 does not shoot the coins during the red flash period, the coins will reflect an unparriable red hitscan that targets any active coins and does 15/22/30 damage to V1 depending on if the shot ricocheted from 1/2/3 coins, with damage not increasing after 3 coins. V2 does not perform this attack while it is enraged.
Shotgun Blast
V2 prefers to use this attack at close range of V1. It will fire twelve pellets from its shotgun that deal 25 damage. The pellets can be parried back to V2, however they won't give the + PROJECTILE BOOST style bonus.
Core Eject Grenade
During this attack, V2 fires its shotgun's core similarly to V1's Core Eject Shotgun. This attack deals 35 damage. The core cannot be parried but it can be sniped, creating a red explosion.
Nail Barrage
V2 can fire a trail of  Nails from the Overheat Nailgun at V1. This attack is unparriable. Each nail deals 8 damage points and can be neutralised by an active Magnet. V2 will not use this attack if it has a Magnet attached to it.
Overheat Burst
V2 can fire a Nail Burst from the Overheat Nailgun at V1. This attack is unparriable. Each nail deals 8 damage points and can be neutralised by an active Magnet. V2 will not use this attack if it has a Magnet attached to it.
Second Phase
During the second phase, V2 will fall down, similarly to its first fight, and will start running towards the left wall of the arena. It breaks it and start sliding down the side of the Great Pyramid. A message saying “You're not getting away this time.” appears, however, it is unknown if this is V1 speaking or an in-game tip. When following V2, V1 will be forced in a sliding position and the fight will continue as such until V2 is defeated.
Strategy
V2 serves as a test of all V1's abilities; it tests their movement and stamina management, their aim and their weapon usage.
The Marksman Revolver's Coins and Projectile Boosts are the most reliable ways to deal damage to V2, due to its agile nature. Expereinced players can attempt to shoot the coins after V2 shoots them to increase the damage they do. Combining the coins with the Electric Railcannon is an extremely effective strategy, and shooting the coins with the Electric Railcannon after V2 shoots them will increase the damage they do and award the + ULTRACOUNTERRICOSHOT x# style bonus.
The Alternate Piercer can also do a lot of damage to V2, however it can be difficult to aim with it.
Airshots with the Rocket Launcher, although requiring the wielder to be skilled at aiming, are extremely strong and can eat through huge chunks of V2's health.
Placing a Magnet on V2 will make the silver nails from the Attractor Nailgun and the burst from the Overheat Nailgun home in on V2, and it will also temporarily disable its Nail Barrage and Overheat Burst attacks. Experienced players can also attempt to use Overheat Storage for practically infinite heatsinks for as long as they can keep the combo up.
Healing off V2 is not an easy task. Waiting for V2's wings to turn red, have it approach you and then blasting it with the Shotgun provides plenty of healing and also does good damage to V2. Parrying its Shotgun Blast with the Feedbacker will refill health up to the hard damage limit, recharge all stamina and deal a good amount of damage back to V2 itself.
Stamina is greatly important in the V2 fight, as dodging V2 requires a lot of dashing in order to not be hit. All of its attacks can be dashed through, however its Shotgun Blast can be parried back instead which is extremely useful for stamina conservation, its Nail Barrage and Overheat Burst can be neutralised with a magnet, and his coins can be shot back to him. Sliding around can be dangerous as too much time spent away from V2 will lead to it enraging, making it very important to stay relatively close to V2 at all times.
Defeated
When defeated, V2 will lose its balance while sliding on the pyramid's side and land head-first onto a desert structure in front of V1, letting out a long scream abruptly interrupted by its crash. The Whiplash can be found in the puddle of blood left by V2, allowing the player to continue and finish the level.
Terminal Entry
TYPE: SUPREME MACHINE
DATA:
After its defeat and escape, V2 dove deeper into Hell, killing other machines for their blood to help its recovery with the intent of taking revenge on V1 and recovering its original arm.
After finding a temporary replacement from one of its victims, V2 used parts from other machines to transform the new placeholder arm into a mobility tool that would allow it to catch up to V1's fast descent into the deeper layers.
In order to prepare for their second and final encounter, it researched the combat data from their previous battle to copy strategies and techniques from the older and more experienced V1 to give itself an upper hand.
However, despite all its preparation, V2 lost again, and unable to escape this time, was brought to a swift and decisive end by its predecessor.
STRATEGY:
- Although V2's coins may seem extremely dangerous at first, they are also an excellent opportunity for high damage if shot before V2 can.
- V2's nailgun can be circumvented or turned against itself via Magnets.
- Hitting V2 with its own arm will cause it to enrage instantly.
Media

