Minotaur |
---|
TYPE: Supreme Demon DATA:
STRATEGY: - Although difficult to heal from due to its distance, it is best to be patient. New trams will often arrive, carrying weaker foes for easier healing.
|
General | ||
---|---|---|
Class | Supreme Demon | |
Health | 80 | |
Weight | Superheavy (Grounded) | |
Rank | 6 | |
![]() ![]() | ||
Head (200%)
|
||
Limbs (150%)
|
||
Conditional Modifiers | ||
Flammable | ||
Airshot | ||
Splatters | ||
Magnet Pull | ||
Radiance Multipliers | ||
Health | 1.5x | |
Damage | 1.5x | |
Speed | 1.5x | |
Appearances | ||
7-1 |
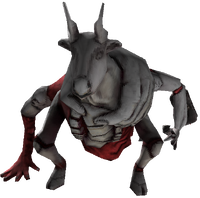
The Minotaur is a Supreme Demon introduced as a boss in 7-1: GARDEN OF FORKING PATHS, and is the seventh Demon-class enemy that the player encounters in ULTRAKILL.
The Minotaur is a large, grotesque mass of flesh and an external white shell sculpted to resemble a bull, similar to the Hideous Mass. The
Minotaur has a bull head wrapped by a shell in the shape of a large hand, and on its exposed belly are what appears to be a set of teeth biting down onto a spine. The Minotaur has three pairs of limbs; two humanoid hind legs, two forelegs which resemble those of a bull, and a pair of humanoid arms. Its left arm, which it uses to wield a large hammer with a handle made from a long arm and a head similar to the Flesh Panopticon, splits into two separate hands.
The Minotaur behaves very differently between its two phases, given that they take place in different arenas and circumstances. Despite this, the Minotaur generally uses a variety of area-denial and rush-down attacks to keep the player on their toes.
The Minotaur will chase down the player while it rides a line of three tram carts. During this phase, the Minotaur will attempt to hit them with its hand and hammer, as well as cover carts with acid or completely destroy them with its hammer. Upon clearing the Minotaur's health bar in this phase, it will let out a yelp of pain and collapse onto the track.
In the room immediately before the exit door, the Minotaur returns in its second form with a broken exterior shell, revealing more flesh underneath its armor as well as a weakpoint in its fractured head. The Minotaur utilizes more area-denial attacks like acid and explosions in this phase, as well as rush down attacks like its four-swing combo and stampede.
While not attacking, the Minotaur will cover its facial weak point with its hand.
Arm Swing Combo
The Minotaur will swing its arm multiple times while moving back and forth across the trams. Each hit deals 25 damage, and cannot be parried.
Swing N' Smash
The Minotaur will roar, swing its hammer once, and then destroy a tram. This attack, similarly to the swing combo, also deals 25 damage, and cannot be parried.
The tram will be missing for a short while, before a new one arrives carrying with it a lone Stray, useful for easier healing.
Acid Splash
The Minotaur will rummage around in its chest and pull out a glob of acid, then splash it onto one of the trams. Depending on the players difficulty, it will either deal 3, 7, or 15 damage per tick.
This acid will linger for a long period before dissipating.
Back Sweep
If the player is riding the Minotaur's back, it will sweep its arm across its back, dealing 25 damage to the player and pushing them off the back of the Minotaur. This cannot be parried.
Stampede
The Minotaur will lean forward and charge at its target, dealing 50 damage on hit. If it misses the target and hits a wall instead, the Minotaur will take 6 damage. The Minotaur will always perform this attack after using three other attacks.
This attack can be parried either normally with the Feedbacker by hitting its head or by ground slamming onto its back during the attack, which deals 30 damage to the
Minotaur and knocks it back, stunning it for a short duration.
Four-Swing Combo
The Minotaur will swing its hammer four times, each hit dealing 25 damage.
Every swing is horizontal except the third, which is vertical.
Two-Explosion Combo
The Minotaur will slam its hammer into the ground, dealing 25 damage, which then creates an explosion that deals 35 damage, before pulling the hammer out, creating a red super explosion that also deals 35 damage.
Acid Splash
The Minotaur will dig into its chest, then pull out an acid bomb and throw it to the floor, creating a puddle of acid that deals 15 damage per tick.
Acid Bomb
The Minotaur will dig into its chest, then pull out an acid bomb and crush it in the air, creating a spherical cloud of acid that deals 15 damage per tick.
Due to the Minotaur's resistant shell and distance from the trams, it can be difficult to heal and deal damage. Coins from the Marksman Revolver may enable the player to deal damage more easily without having to aim directly at the
Minotaur, and its large swing attacks will occasionally leave its belly more exposed, allowing for greater damage. Using the Screwdriver Railcannon can extend the healing range of the
Minotaur, making healing a less risky move and providing an opportunity for strong damage by parrying the screw. The player can also employ the use of the Strays that occasionally take the place of destroyed trams, but they must be wary as these spawn between fairly large intervals and only when a tram has already been destroyed.
While most of the Minotaur's belly is not weak to any particular attack, its dangling guts and flesh arm are susceptible to the 1.5x locational damage multiplier from the Standard Revolver, making them decent targets to deal additional damage.
Staying in the air during this portion of the fight is very helpful, as it allows the player to avoid the acid pools and certain swing attacks, but when in the air it is recommended to keep mobility to a minimum. Excessive dashing or slamming may lead the player into an attack or off the tram. If the player is desperate for health, they can briefly ride on top of the Minotaur's back for a heal, which presents the risk of being further damaged by the Minotaur's Back Sweep attack.
During the fight, up to two trams may be rendered hazardous at a time, due to acid or destruction via the Minotaur's hammer. If the player wishes to minimize this, they can attempt to guide the Minotaur into destroying a tram already covered in acid by staying near or over the afflicted tram. Doing so will give the player more room to avoid attacks, but comes with a greater risk of getting hit.
The Minotaur will always perform its Four-Swing Combo when it ambushes the player at the start, meaning they can take advantage of this to set up traps with weapons such as the Sawblade Launcher with
magnets. From this point onward, keeping a distance from the
Minotaur is a viable strategy due to its lack of many ranged attacks.
When the Minotaur is performing its charge attack, the player may parry it for great damage, dealing around a whole third of its present health and temporarily stunning it. The player also has the ability to jump above the Minotaur and power slam onto it during the charge as an alternative parry method. If the player is not confident in their ability to parry the charge, they can alternatively bait the Minotaur into a wall to stun it for a shorter time and deal a small amount of damage.
In the second phase, whenever the Minotaur is performing an attack, a weak point in its fractured head is exposed, making it possible to attack with any weapon, and particularly vulnerable to the Standard Revolver's locational damage. If the
Minotaur is not actively attacking it will otherwise cover the weak point with its hand.
Minotaur |
---|
TYPE: Supreme Demon DATA:
STRATEGY: - Although difficult to heal from due to its distance, it is best to be patient. New trams will often arrive, carrying weaker foes for easier healing.
|
Minotaur |
---|
TYPE: Supreme Demon DATA:
STRATEGY: - Although difficult to heal from due to its distance, it is best to be patient. New trams will often arrive, carrying weaker foes for easier healing.
|