The Impact Hammer, colloquially referred to as the Jackhammer, is the Alternate Weapon form of the  Shotgun. It uses an exclusively melee attack unlike its counterpart, and determines the damage of hits based on the velocity of the player. It is the third and final Alternate Weapon found in the game, unlocked in 7-2: LIGHT UP THE NIGHT after finding a series of secret passages throughout the level.
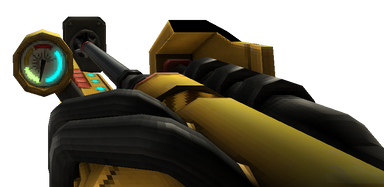
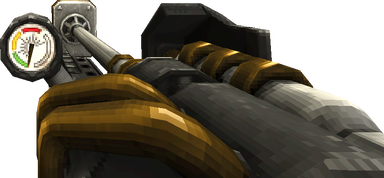
Of all the Alternate Weapons, the Impact Hammer is the most visually distinct from its Standard counterpart. It resembles a mechanical arm with weathered yellow plating and wheel-like joints on the shoulder and elbow. The forearm is shaped like a piston with hydraulic components and tubing, a decal of an animal on the side, and a small turbine across the middle. When the player is moving, the turbine will spin relative to their speed. When performing an attack, the piston will briefly retract and then shoot outward. Attached to the forearm is a small gauge with three levels on the left side which indicate the current velocity of the player, shown in green, yellow, and red. On the right side of the gauge is a bar indicating the weapon's alternate fire.
Obtaining
The Impact Hammer is obtained in 7-2: LIGHT UP THE NIGHT after activating a set of three numbered stone slabs throughout the level. Each of the slabs can be found at the end of a parkour segment involving the  Yellow Hookpoints introduced in this level.
The first parkour segment is found at the very beginning of the level, before any enemy encounters. When the player activates the first Yellow Hookpoint, it will unlock a small gate in the floor at the end of the segment forcing the player to quickly complete the parkour before the first hookpoint deactivates. If performed correctly, the player will be able to fall into the gate next to the staircase at the end, landing in a small pool of water where they can find the first stone slab, numbered with the Roman numeral 1, and another hookpoint to exit and return to the rest of the level.
The second parkour segment can be found at the Train Station portion of the level, directly after the enemy encounter. The player must once again activate the first Yellow Hookpoint at the start, which will unlock a small gate at the end of the parkour segment. Then, they must proceed quickly through and reach the end. dropping down into another hidden passageway where they can find the second slab, marked with a Roman numeral 2, and another hookpoint to exit.
The third and final hookpoint parkour is located in the Bomb Station, where the Payload is obtained. Like the first two challenges, the first hookpoint will activate a hidden gate at the end of the segment, meaning the player must proceed quickly to get to the hidden slab. At the end the player can drop down to the final hidden passageway and activate the last stone slab, marked with a Roman numeral 3, and exit using the corresponding hookpoint.
After all three stone slabs have been pressed and activated, the player must visit the station in the middle of the tram rail, where two  Guttermen are encountered. On top of the building is a hole in the roof from a fallen payload shell, which can be entered to reveal a large empty room with a casket against the wall. Entering the casket will reveal a stone passage with a machine's corpse lying in a pool of blood at the end. This machine, referred to as an Excavator, possesses the Impact Hammer as its arm, which can be taken from it.
Upon obtaining the Impact Hammer, the player will receive a prompt briefly detailing its differences from the standard Shotgun:
ALTERNATE SHOTGUN: Melee only.
Move fast to deal more damage.
Mechanics
The Impact Hammer's primary fire is exclusively melee-based, sharing the same accuracy and range as punches from the  Feedbacker and
  Knuckleblaster. The primary fire does not activate instantly, and must briefly charge up for a moment before firing. It can also be held for any amount of time before releasing to fire. The damage that the primary fire does is directly based on the current speed of the player, indicated by the gauge on its side. At 0 u/s to 19 u/s, the gauge on the hammer will be green, indicating that the hammer is at low velocity and will deal 3 damage on hit. At 20 u/s to 39 u/s, the gauge on the hammer will be yellow, indicating medium velocity which deals 6 damage on hit. At 40 u/s and upwards, the gauge on the hammer will read red, indicating it is at the highest possible velocity and will deal 10 damage on hit. Low and medium velocity hits will result in a normal reload time between firing, but high velocity hits will result in the Impact Hammer's primary fire becoming inoperable for 7 seconds, indicated by the weapon falling to the side and releasing steam.
Upon hitting an enemy, the Impact Hammer will create a brief hitstop, increasing in length based on the velocity of the hit. Based on velocity, the Impact Hammer will also launch the player away from an enemy or surface. The direction which the Impact Hammer launches the player is dependent on where they are looking when it is fired, allowing the player to change its direction by facing a different way during the hitstop if hitting an enemy.
The Impact Hammer has the ability to break  Idols on hit as a melee weapon, as well as Gutterman shields. Similarly to its Standard counterpart, it has the ability to parry melee hits using its primary fire, which is known as a Hammer Parry. The Impact Hammer can also hit cores and rockets, turning them into hitscan shots which produce an explosion on contact with a surface or enemy.
Usage
The Impact Hammer emphasizes the Shotgun's ability to excel at close range by being an exclusively melee weapon. Melee weapons have a larger range of accuracy to nearby targets, allowing them to hit an enemy even if it is not directly aimed at. Melee weapons will also bypass enemies which have armor or immunities on certain parts of their body. Because the Impact Hammer is able to break Idols and Gutterman shields, it can also be used as a backup tool in cases where arms are unavailable due to arm exhaustion or parries. It can also parry melee attacks much like its standard counterpart, dealing more damage and taking advantage of enemy damage modifiers that normal parries with the Feedbacker are unable to.
Although low velocity hits deal decent damage, the Impact Hammer works best with well-placed movement, and medium or high velocity hits are often the best way of utilizing its potential strength. Medium velocity hits are best achieved by falling from small distances, sliding, slide jumping towards enemies, or using the  Whiplash, while high velocity hits can be quickly achieved using techniques such as dash jumping, explosive boosts, or slams from great heights. Due to the long cooldown after performing high velocity hits with the Impact Hammer, however, it may be preferred to use multiple medium hits consecutively and moderate speed, as to not go too fast and minimize time between shots.
The Impact Hammer functions excellently as a momentum tool because of its strong knockback on-hit, making it a great method for traversing distances quickly during an enemy encounter, escaping dangerous situations, or continuously chaining hits between enemies by taking advantage of the speed to wind up another shot. Due to the wind-up time necessary to make a hit, holding down the fire key to keep the weapon at the ready beforehand when moving between enemies may be preferable to ensure that less time is spent setting up an attack.
Although the Impact Hammer is mostly exclusive to close-range damage, it can provide powerful mid-to-long-range attacks by the use of cores or rockets from the  Rocket Launcher. Because the Impact Hammer is able to turn cores and rockets into high-damage hitscan attacks, it can be used to clear crowds where it would normally only hit single targets, or deal strong damage to big enemies which are dangerous to approach head-on, the only downside being the amount of preparation necessary.
Variants
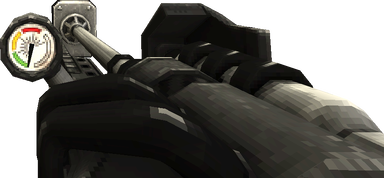
The Core Eject Impact Hammer is the blue variant of the Impact Hammer. Its alternate fire launches an explosive core from the hammer. Unlike its Standard form, the core cannot be charged to fire farther, and instead fires based on player momentum.
Mechanics
The Core Eject Impact Hammer's alternate fire launches an explosive core from the forearm of the hammer outward in a small arc. The distance and momentum of the core's trajectory is dependent on the player's own momentum. Cores will explode on contact with any surface or enemy, dealing 3.5 damage, or 35 damage to the player.
Cores can be shot with any hitscan attack, detonating prematurely in a much larger explosion. When shot with any  Revolver hitscan,
  Alternate Revolver hitscan, or the
  Electric Railcannon, a core will detonate into a significantly larger red explosion that deals 7 damage on contact with enemies. When shot by another core or a rocket turned hitscan by the Impact Hammer's primary fire, or by the
  Malicious Railcannon, an extremely large explosion will occur, with the inner radius of the explosion being that of whichever hitscan was used to perform the shot. This explosion deals 13.25 damage.
Cores are the first object to be prioritized by the  Marksman Revolver's coin lock-on, only following other coins.
Usage
Cores shot by the Core Eject Impact Hammer on their own are not very powerful, dealing relatively low damage and launching at a very short distance. However, their strength comes in their ability to inherit the momentum of the player. Since it shoots out a core itself and with little cooldown, the Core Eject is the easiest method of turning explosives into hitscans, making it powerful as a mid-to-long range burst damage weapon, and because cores inherit the momentum of the player, cores can be shot out when at high speeds and still consistently hammered for large amounts of damage.
Additionally, the ability for cores to be shot by hitscans makes them good for larger crowd control in combination with the Revolver, although not to the same degree as the Core Eject Shotgun due to the inability for cores to launch at long range. The explosion of cores prematurely detonated by hitscan shots will have greater strength and blast radius, and can bypass the explosion immunity of the normally resistant  Soldiers.
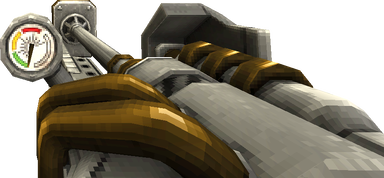
The Pump Charge Impact Hammer is the green variant of the Impact Hammer. Its alternate fire pumps the hammer, increasing the blast radius and strength of the next shot. It can be pumped up to three times, with the third pump causing the next shot to produce a large explosion, dealing damage to both enemies and the player.
Mechanics
The alternate fire of the Pump Charge Impact Hammer will pump the hammer, giving the next shot a damage-dealing shockwave around the player. The Pump Charge can be pumped up to three times, with any subsequent pumps having no effect on the next shot. On one pump, the next shot fired by the Impact Hammer will create a small shockwave around the player dealing 3.5 damage. On two pumps, the radius of the shockwave will be significantly increased. On the third pump, the Pump Charge Impact Hammer will begin to produce an alarm sound, signifying that the next shot will produce a much larger explosion that deals 7 damage to enemies and 35 self-damage to the player.
Pumping the Impact Hammer has no cooldown and can be done at any time, even if the primary fire itself is on cooldown from a high velocity hit. After a pumped shot, the Pump Charge Impact Hammer will always reset to its default state.
Usage
Whereas the Impact Hammer's primary fire on its own can only hit single targets, the Pump Charge variation transforms the weapon into one which can excel at quick, easy-access burst damage and crowd control by use of its shockwaves and lack of alternate fire cooldown. Low velocity hits can be made more powerful and worthwhile with shockwave damage, and medium/high velocity hits can be made more effective at dealing with crowds, without putting the player at what would often be a disadvantage when being knocked far away from enemies.
Unlike the Shotgun variation, one-pump hits and two-pump hits are functionally very similar, as the second pump does not increase damage but rather simply the radius of the shockwave. Two-pump hits are still a better option at dealing with large groups of enemies, but it also means that there is less setup necessary to achieve similar amounts of damage. Additionally, Idols and Gutterman shields can be broken by the shockwave much like direct hammer hits, and such can be done in a larger radius than the Knuckleblaster.
The overpump explosion of the Pump Charge Impact Hammer has great synergy with high velocity hits, as the speed of knockback allows the player to escape the explosion radius while dealing massive damage at the same time. As well as this, the explosion deals significantly less self-damage than the overpump of the Pump Charge Shotgun, meaning that a player can survive more than 1 overpump, and use explosions for boosting at less expense.
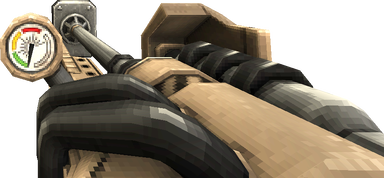
The Sawed-On Impact Hammer is the red variant of the Impact Hammer. Its alternate fire revs up a chainsaw attached to the side of the hammer, which can be released to launch it outward on a tether, and subsequently punched to keep it airborne.
Mechanics
The alternate fire of the Sawed-On Impact Hammer revs up a small chainsaw attached to the hammer's side when held, causing it to deal damage on contact with enemies directly next to the player. On release, the chainsaw will launch outward on a tether and then return, with the distance dependent on how long it was revved up before releasing. While launched, the chainsaw will pierce through enemies it comes into contact with, hitting them 3 times before doing so. Chainsaws take 4 seconds to recharge after being shot, but that time is doubled if a chainsaw remains active while another one is recharging. Chainsaws will persist even after swapping to a different weapon.
When a chainsaw returns to the player, a brief red flash will appear in the middle of the screen indicating that the chainsaw can be punched by the Feedbacker or the Impact Hammer's primary fire to launch it again. This can be done as many times as desired, and allows multiple chainsaws to be launched at once. If a chainsaw is instead punched by the Knuckleblaster, it will break from its tether entirely, becoming an independent projectile that will ricochet off surfaces and pierce through enemies, hitting them 4 times on contact. Detached chainsaws will eventually break after hitting many surfaces and/or enemies, and can be punched to propel them in a different direction. They are also affected by magnets from the  Attractor Nailgun, spinning in a small circle around the magnet.
Chainsaws that are tethered can receive and transmit conductor hitscans created by shocks from the  Jumpstart Nailgun or Electric Railcannon on enemies that are embedded with nails.
Usage
The Sawed-On Impact Hammer specializes in raw strength, being a weapon with simple technique and the ability to stack damage on top of other weapons while firing. If a player can balance between the concentration of using other weapons and juggling a chainsaw with the Feedbacker, they can greatly increase their damage potential at a time. The Sawed-On, when juggled, also works well against large or slow-moving enemies, as it is more likely to hit them both on the way out, and towards the player. Even without juggling, the Sawed-On can work to simply improve the base Impact Hammer's strength if launched at the same time as a primary fire hit.
The chainsaw of the Sawed-On is an incredibly powerful healing tool, especially when revved but not launched. Running through crowds of enemies with a revved chainsaw can very quickly bring a player back to full health or Hard Damage limit, and when launched, can pierce through groups and release large amounts of blood in the process.
Chainsaws also function well as a magnet trap weapon, especially in conjunction with the  Sawblade Launcher. Sawblade traps formed around magnets benefit from the increased power of a chainsaw which has been detached from its tether, and the chainsaw will hit each individual enemy more times at once than sawblades can.
Advanced Techniques
Whiplash Cancelling Hit
Using the Whiplash, the player can quickly achieve the speed necessary for a high velocity hit with the Impact Hammer. This is performed by whipping to an enemy, then using either the Feedbacker, Knuckleblaster, or a second Whiplash press to cancel the Whiplash, sending the player forward towards their target at a much higher speed and resulting in a high velocity hit.
Hammer Swapping
Much like the Shotgun, the Impact Hammer can be quickly swapped to negate its recharge animation. Doing so will cause the animation of the previous Impact Hammer variant to carry over to the next, meaning the next variant will take significantly less time to wind up its hit. With this in mind, the player can do so in quick succession for large amounts of damage.
Explosive Boosts
Explosions can be used to the player's advantage for quick and easy-to-access movement at the cost of significant self-damage. In the Impact Hammer's case, this comes in the form of core boosting and overpump boosts. Core boosts can be performed by sliding and shooting a core from the Core Eject during the slide. Due to the player's slide being slightly faster than the speed of the core's travel arc, the core will end up behind the player as it hits the ground, quickly pushing them forward at the cost of 35 self-damage.
Overpump boosts, on the other hand, involve preparing an explosive shot from the Pump Charge Impact Hammer by pumping it three or more times, aiming in the opposite direction of that which the player intends to boost, and then firing, causing them to be quickly shot outward from the explosion at the cost of 35 self-damage. Unlike core boosting, this explosive boost can be performed in any direction and in midair, but requires slightly more preparation.
Core Nuke
A core nuke is performed by shooting a core with certain forms of hitscan attacks, these being either another core or rocket turned hitscan by the Impact Hammer's own hit, or a shot from the Malicious Railcannon. However, core nukes are almost always performed with the latter weapon due to its ease of use and lack of setup. A core nuke is the largest explosion achievable by the player alone, and deals 13.25 damage to enemies on contact, making it one of the most volatile tools for dealing quick burst damage or clearing large crowds of enemies near-instantly.
Overpump Dash
The self-damage of performing an explosion from an overpumped Pump Charge Impact Hammer can be negated. This is done by dashing out of the way slightly before firing the explosion, giving the player invincibility frames while exiting the blast radius. Due to the nature of the Pump Charge Impact Hammer, however, unlike its Shotgun form, the explosion can only be consistently avoided by dashing backwards, rather than in any direction.
Style Bonuses
| Name
|
Points
|
Description
|
| + OVERKILL
|
100
|
Kill any small enemy with a point-blank Shotgun or Impact Hammer blast.
|
| + PARRY
|
100
|
Parry any enemy attack.
|
| + BLUNT FORCE
|
80
|
Kill an enemy with a low velocity Impact Hammer hit.
|
| + HEAVY HITTER
|
100
|
Kill an enemy with a medium velocity Impact Hammer hit.
|
| + BLASTING AWAY
|
100
|
Hit an enemy with a high velocity Impact Hammer hit.
|
| + FULL IMPACT
|
100
|
Kill an enemy with a high velocity Impact Hammer hit.
|
| + GROOVY
|
60
|
Kill any enemy with the Sawed-On Impact Hammer's chainsaw before firing it.
|
| + NO-NO
|
40
|
Kill any enemy with the Sawed-On Impact Hammer's chainsaw after firing while it's still attached.
|
| + RE-NO-NO
|
60
|
Kill any enemy with the Sawed-On Impact Hammer's chainsaw after firing while it's still attached and parrying it with the Feedbacker at least once.
|
| + UNCHAINEDSAW
|
80
|
Kill any enemy with the Sawed-On Impact Hammer's chainsaw after detaching it with the Knuckleblaster.
|
| + ATTRAPTOR
|
60
|
Kill any enemy with any type of  Nail, Nail,  Sawblade, or Sawblade, or  Chainsaw stuck to or orbiting around one Chainsaw stuck to or orbiting around one  Magnet. Magnet.
|
| + BIPOLAR
|
120
|
Kill any enemy with any type of Nail, Sawblade or Chainsaw orbiting around or between two Magnets.
|
Media
Render of the Impact Hammer by Victoria
Render of the Excavator by Victoria
Trivia
- Unlike the Alternate Revolver, the Impact Hammer has an officially designated name. This is also a trait shared by the Sawblade Launcher.
- The machine from which the Impact Hammer is obtained is referred to as the Excavator. It is the only known machine of its kind, and is never mentioned elsewhere in the game.
- The Excavator has a flag on its right side which reads, "Vegter Van Die Volk." The phrase is in Afrikaans, translating to "Warrior of the People."
- On the Excavator's front is a decal resembling an unspecified animal of some kind. The same decal is present on the forearm plates of the Impact Hammer itself.
Color Customization
Each unlockable preset is reproducible one-to-one with custom colors; their corresponding color and hex codes are also in the table below.
| Name
|
Soul Orbs
|
Color Code
|
STANDARD
|
0
|
N/A
|
CLASSIC
|
10
|
R: 0.00
G: 0.00
B: 0.00
R: 0.00
G: 0.00
B: 0.00
R: 0.00
G: 0.00
B: 0.00
|
PALACE
|
25
|
R: 0.60
G: 0.60
B: 0.60
R: 1.00
G: 0.66
B: 0.00
R: 1.00
G: 1.00
B: 1.00
|
CARAMEL
|
50
|
R: 1.00
G: 0.80
B: 0.60
R: 0.60
G: 0.60
B: 0.60
R: 1.00
G: 0.80
B: 0.60
|
LUXUS
|
100
|
R: 0.00
G: 0.00
B: 0.00
R: 1.00
G: 0.65
B: 0.00
R: 0.00
G: 0.00
B: 0.00
|


